
Prime Cargo WMS API Documentation
Prime Cargo WMS API is created as an addition to Prime Cargo's existing integration solutions and meant to replace these over time. Therefore the first release of the API will mostly have the same functionalities as the existing solutions, but also a few new options.
Infrastructure & architecture
The API is based on the Open API standard and is running on Azure App Services. Accessibility to the API is managed through Azure’s API Management.
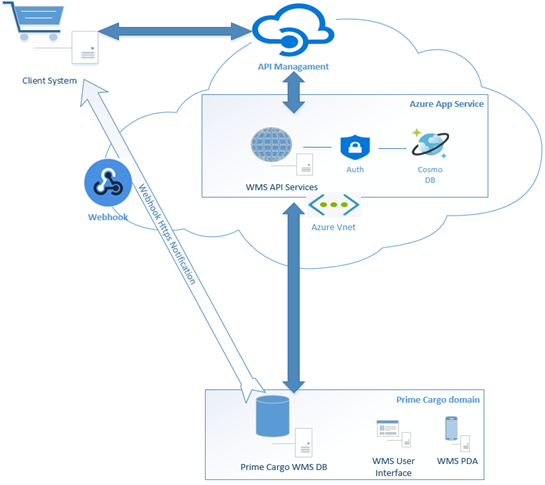
API Management is the gateway to the Prime Cargo WMS API, providing access to the API’s functionalities through subscriptions. API Management includes a developer portal, which is the this website, where subscriptions and documentation is available, and where manual tests of the different API action can be done.
Azure App Service is the cloud based host where the API is hosted, making the API service fully scalable, so it can accommodate peaks in load. Besides the subscription for the API Management, you will receive at least one API user, which is stored in the cloud based Cosmos DB database. This is the user you will need to access the API's actions. The API retrieves the requested data from the WMS Database, with the help of potential parameters, and returns it in a response to the API client.
Webhooks are also supported in the system that the API resides in. It is possible to subscribe your webhook to events, which will trigger a HTTP notification to the subscribed webhook URL. F.x. when the pick procedure of a pick/sales order begins or when it is finished. The subscribed webhook receives a HTTP notification, with either basic information that can be used to retrieve more data through the API, which in turn can be used to update the client side system. Or the HTTP notification includes a collection of data informing the client with details about the event, which also can be used to update the client side system.
Interaction
Below is a diagram showing, in general, the basic interaction between the client and the WMS through the API.
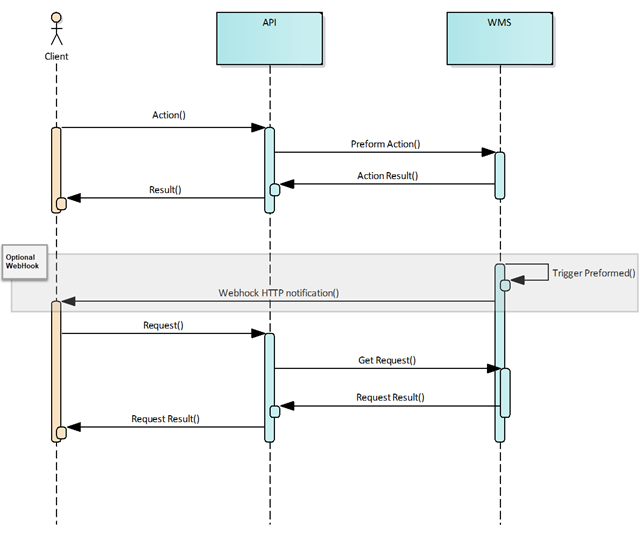
As shown above, the client requests an action, with an HTTP request, the API receives the request and performs a number of operations, including storing and/or retrieving data from the WMS, and afterwards the API returns a response, with HTTP response code 200, and a result to the client. This result will tell if the action succeeded and if so, include the requested data. All data is exchange in JSON format, except when parameters are passed in request queries or headers. In POST requests, data can also be passed to the action, in the request body, and as mentioned, in the JSON format.
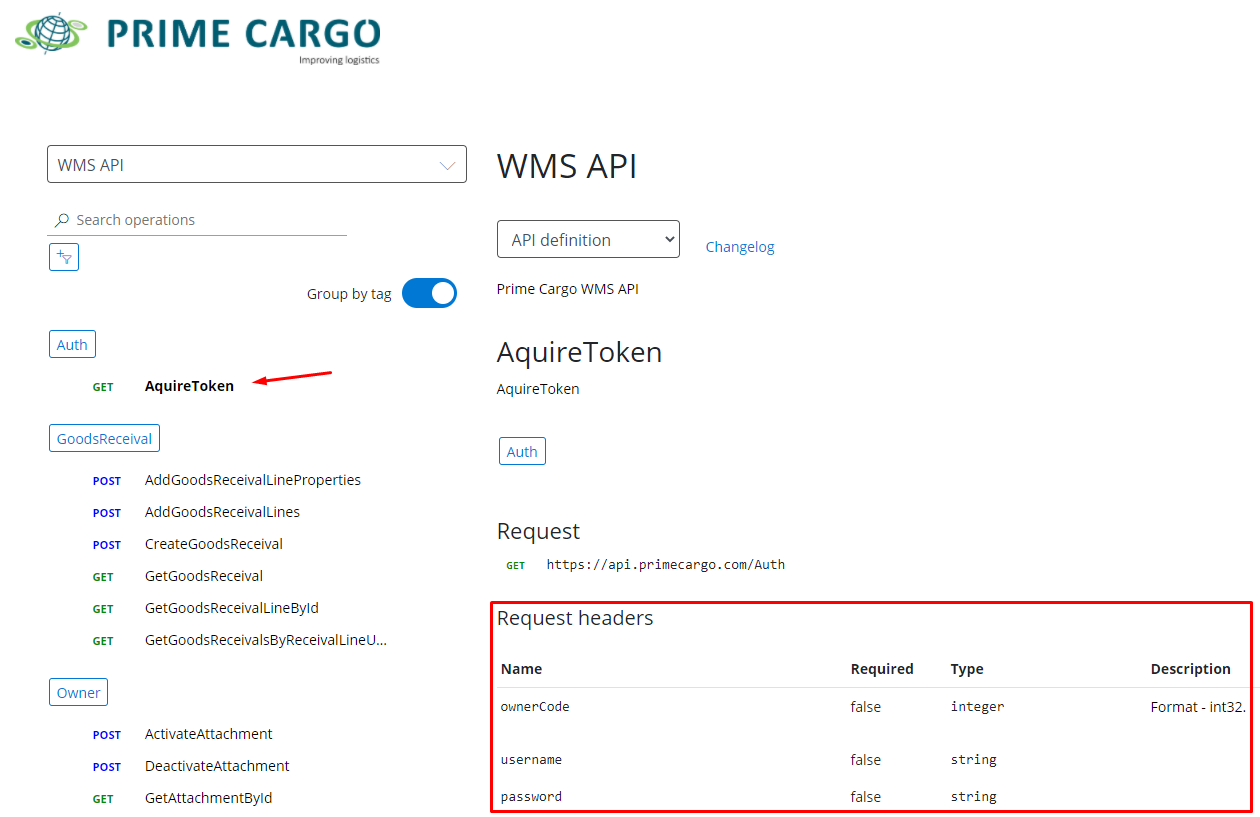
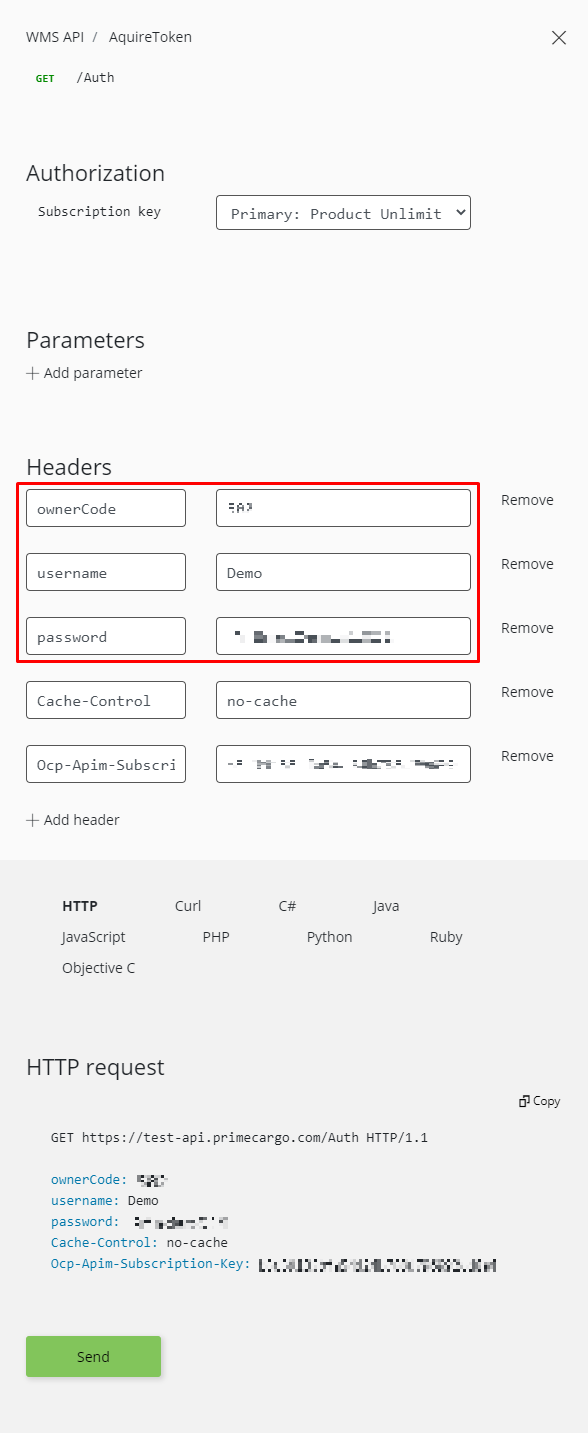
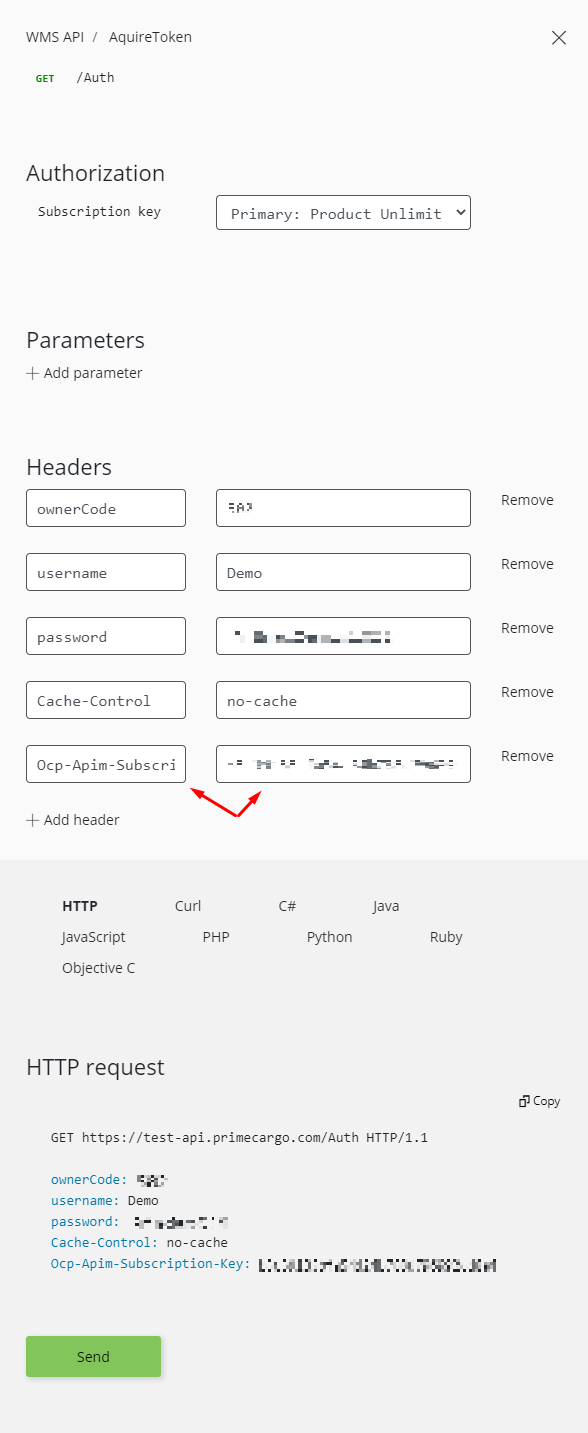
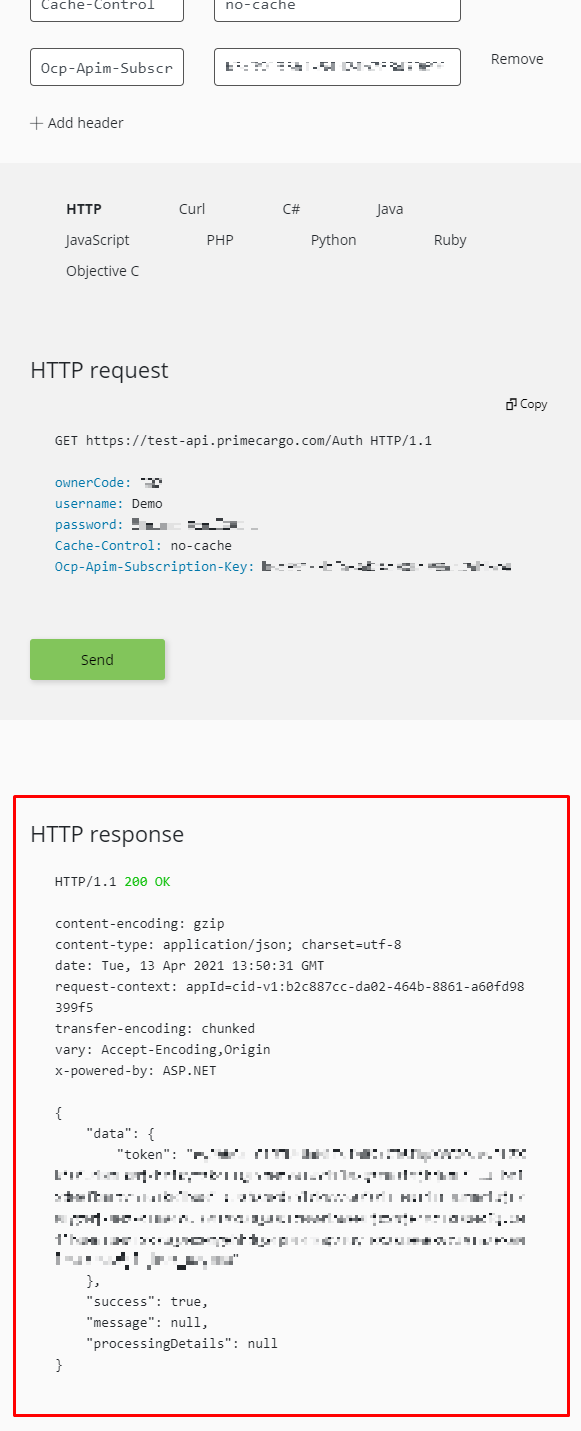
Currently an action may require between 1 and 3 parameters, given in either the request queries or in the request headers. Furthermore actions requested with POST requests may require data passed through the request body. In the example shown later, requesting the Auth (AquireToken) action with a HTTP GET request, we need to provide the API user credentials as headers, ownerCode, username and password.
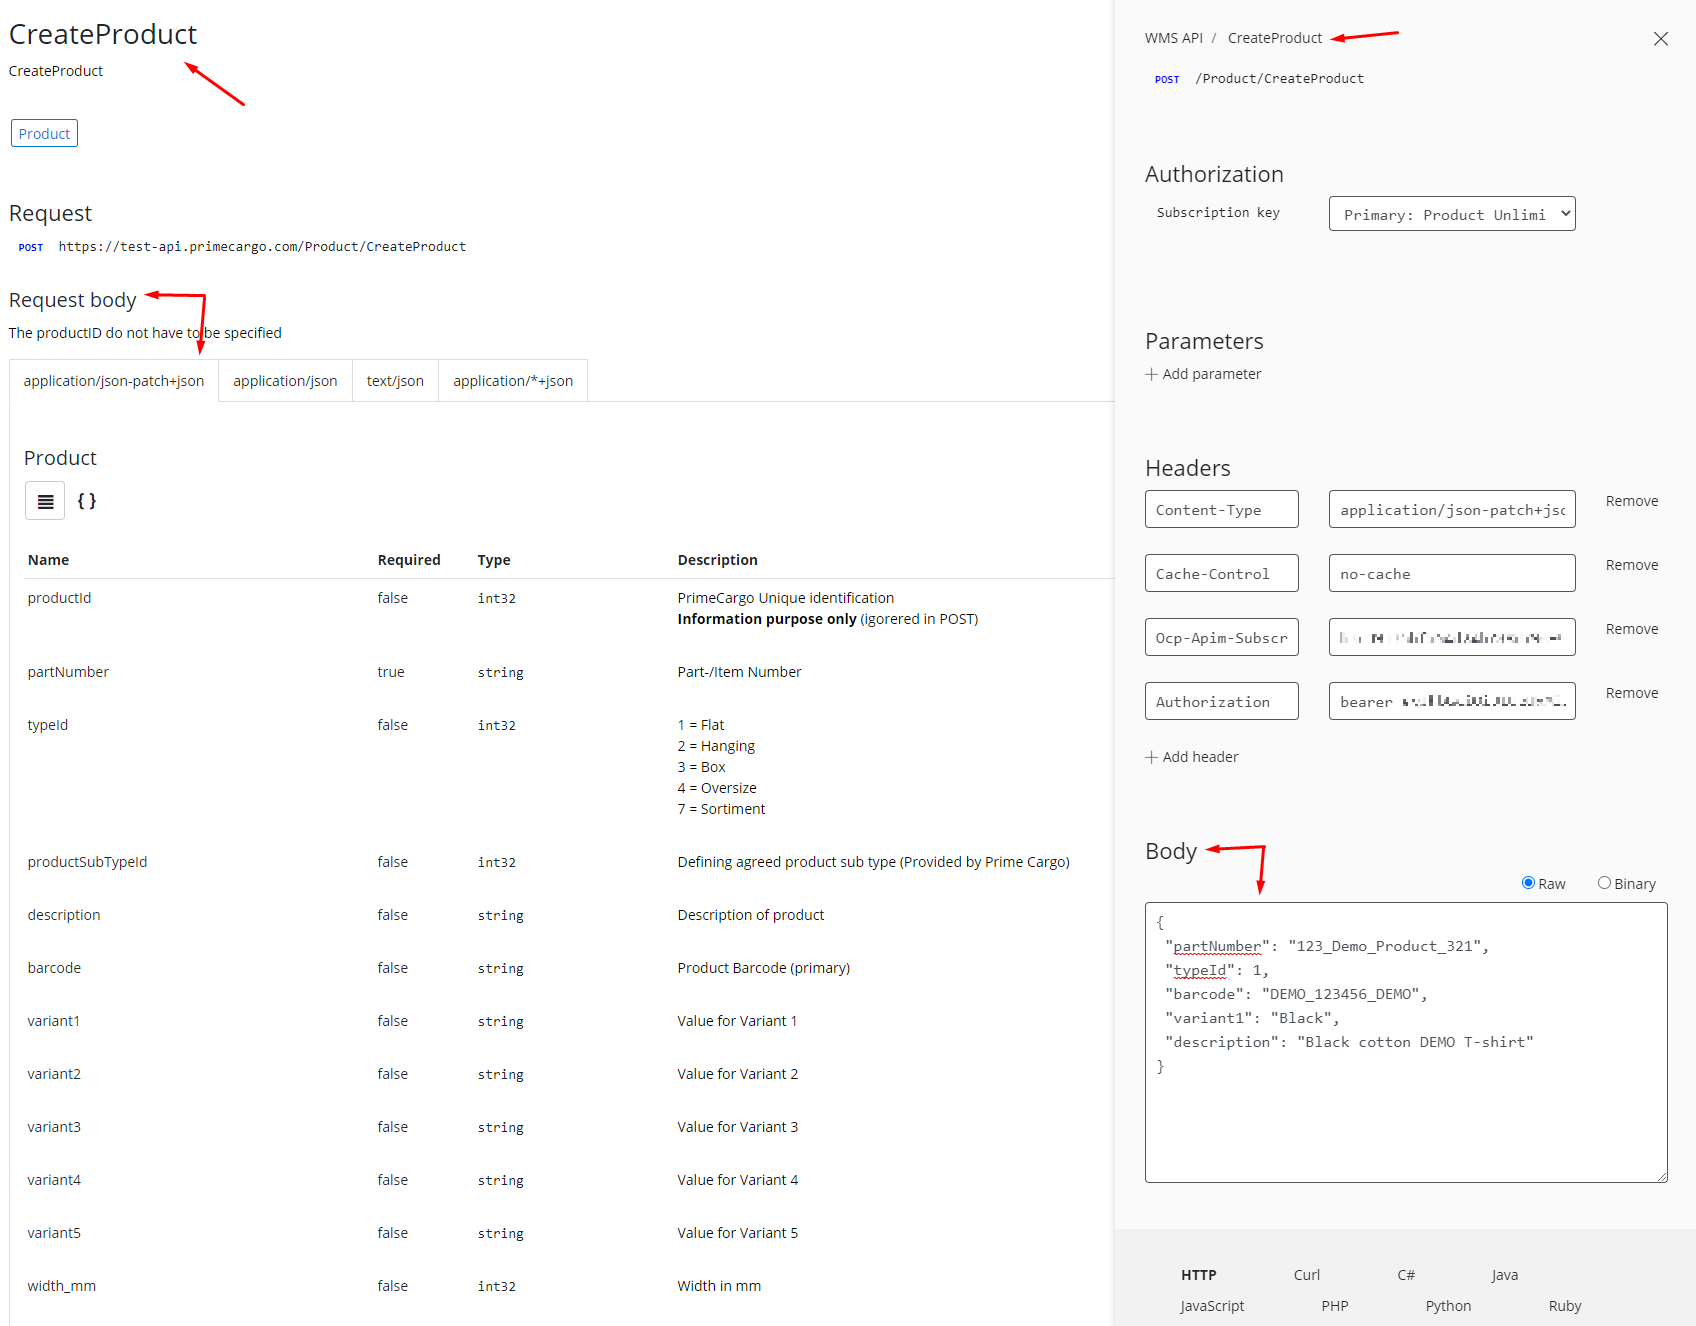
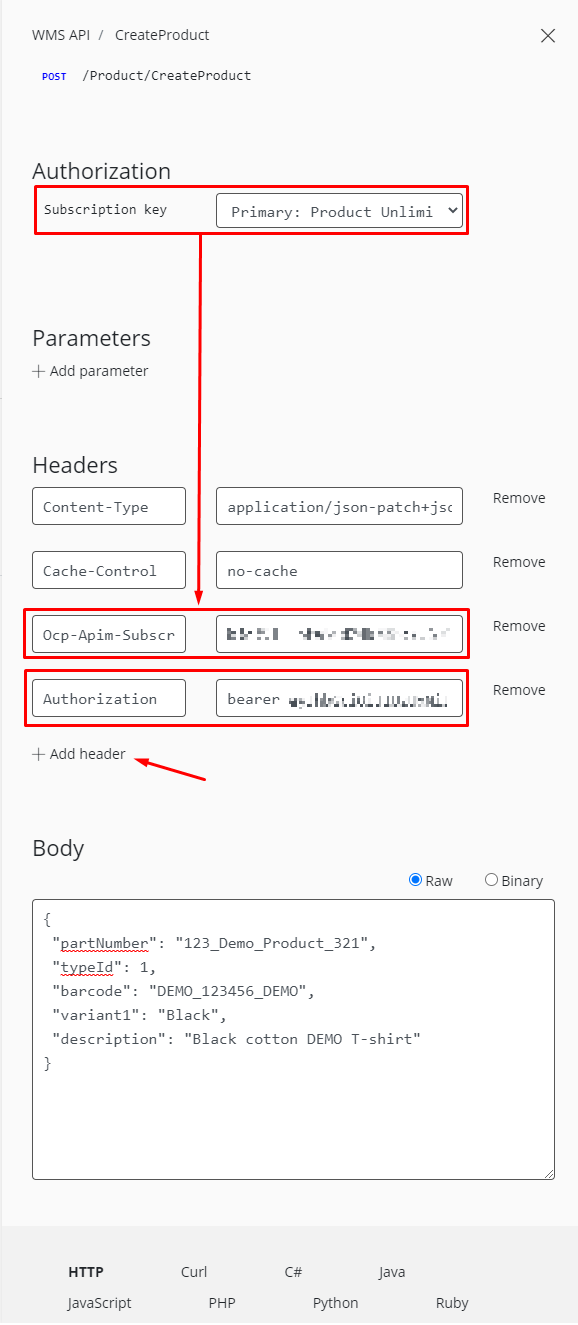
Here is another example. This time we send a HTTP POST request for the CreateProduct action where we pass the product details in the request body in the JSON format.
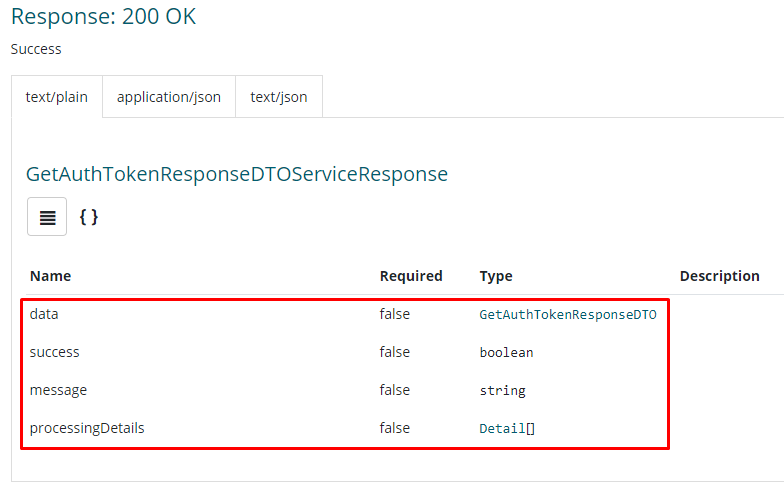
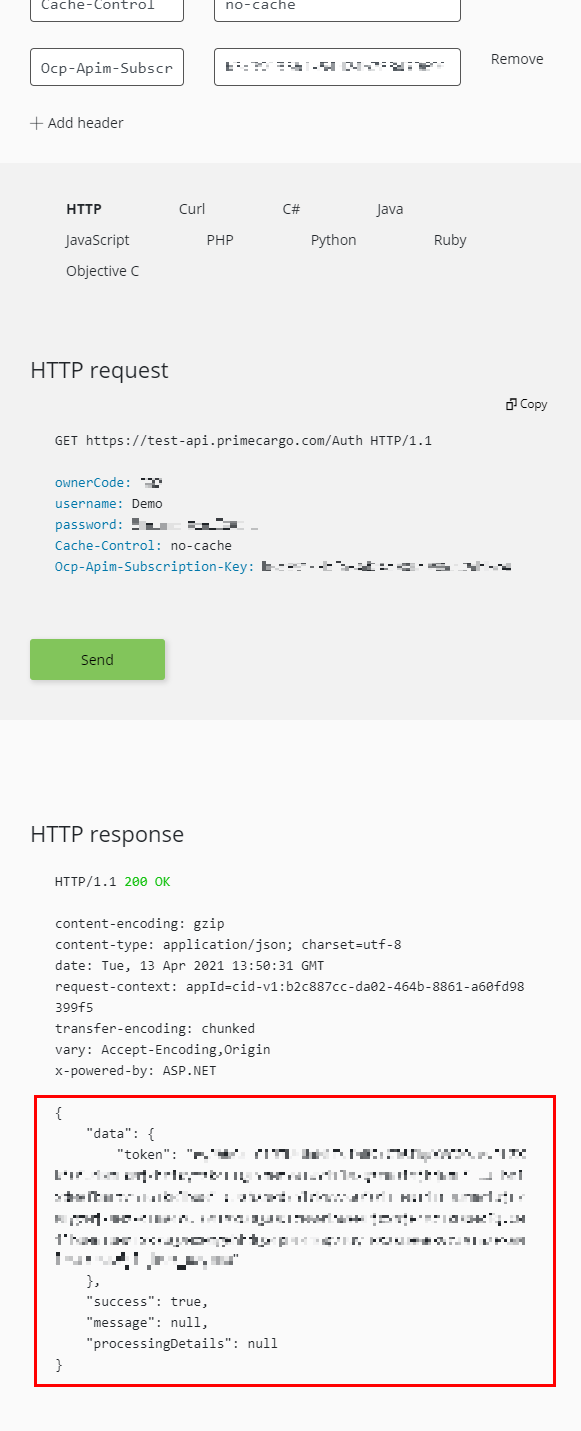
An API action will almost always return a response, with an HTTP response code 200 (OK), and a JSON response object in the response body. This object will include properties to signal if the action succeeded or failed, a message, processing details to describe any errors or warnings and of course the requested data if the action succeeded. From the same example, which is used later on, we can see that the response returns the response code 200 (OK) and the the body contains the JSON Response object. In this case the response object is an GetAuthTokenResponseDTOServiceResponse, and from this object name we can determine the JSON object in the data property of the JSON Response object, again in this case GetAuthTokenResponseDTO, which will be data we ask for. In the JSON response object, we also find the success property, which tells us if the action succeeded in combination with the message and processingDetails property. An action can in fact succeed with warnings, and the message will tell us if this is the case, and processingDetails will give us the details about the warnings. If the action fails it means that an error occurred, and the message will reflect this, while the processingDetails will give us the details about the errors.
To be clear, an action has.
Fully and completely succeeded, if the success property of the JSON response object is true, and the message contains nothing about warnings.
Succeeded with warnings, if the success property of the JSON response object is true, and the message mentions warnings.
Failed with errors, if the success property of the JSON response object is false.
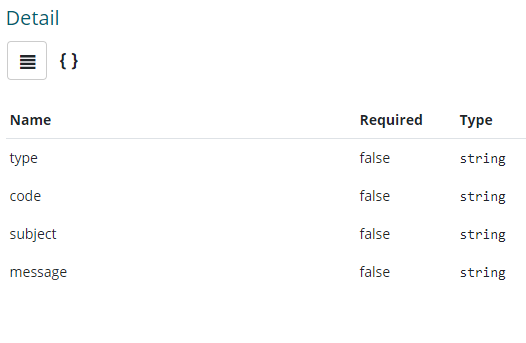
It is also worth mentioning that processingDetails is a collection of Details objects, and these contain details about warnings and errors.
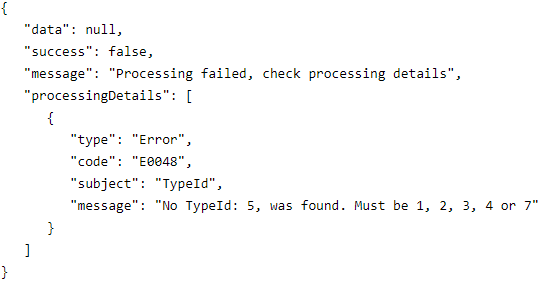
As you can see in the image below, Details consists of four properties. Type will tell us if the detail is about a warning or an error, code will tell us exactly which error or warning the detail is about, subject and message will give us the details about the error or warning.
F.x. Below we see the body of a response to the CreateProduct action that did not succeed. The body contains the JSON response object, without the data asked for, the product we wanted to create, because the action did not succeed, and the message and processingDetails tell us why the action did not succeed.
You can download the entire list of errors and warnings here, sorted by actions (This list is yet to be completed).
Besides the direct interaction with the API, the client can subscribe webhooks to events, if the client uses webhooks, these subscriptions are called triggers. In this case the client will contact the Integration Manager at Prime Cargo with information about which of the following events they want to subscribe their webhooks to. The events describe processes occurring at Prime Cargo, which should result in notifying the client about changes and updates.
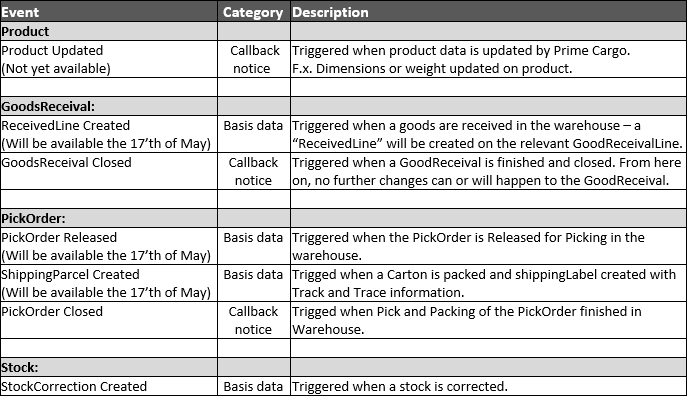
The Integration Manager will make sure that the triggers are created and notify the client. Afterwards the client must update the triggers with the URL of the their webhook, which will receive the notifications and process the data, and also activate the triggers. This is done by first requesting the GetTriggers action, which will return the Id of the triggers and the type of event that will fire the trigger. With the trigger id the UpdateTriggerURL action, and the UpdateTriggerActiveState action can be requested. The former requires an URL to the webhook that will handle the notification request from the trigger, and the including data, the latter requires a boolean value, true, to activate the trigger.
The notification request triggered from events in the Callback notice category will require the client to request a relevant "get" action, to acquire changes and updates, after the client's webhook receives the notification. Therefore these notification requests will also only include enough data to allow the client to call the relevant "get" action. F.x. the notification request sent from a GoodsReceival Closed trigger will include goodsReceivalId and receivalNumber, which is what is required to be able torequest the GetGoodsReceival action.
Notification requests triggered by events in the Basis data category will include details about the changes and updates, and therefore the client will not necessarily have to request a "get" action to update the client's end. F.x. the notification request sent from a StockCorrection Created trigger will include productId, partNumber, barcode, reasonCode, eventDate and of course qtyDiff, which indicates how to regulate the stock (negative og positive) at the client's end.
Getting started
To start using the API, you must first have an account in the API Manager and a user for the API. If you do not have these yet, start by contacting the Integration Manager at Prime Cargo, who will make sure that you receive an invitation e-mail to create an account in the API Manager, and also receive a API user. The invitation to create an account in API Manager will ask you to confirm your account, and add a password to the account. Once you have completed the creation of your account, and received credentials for your API user, you are ready to use the API.
First, sign in to your API Manager account, and navigate to the Profile section. Here you will find your account subscriptions and subscription keys, which you will need in the next step.
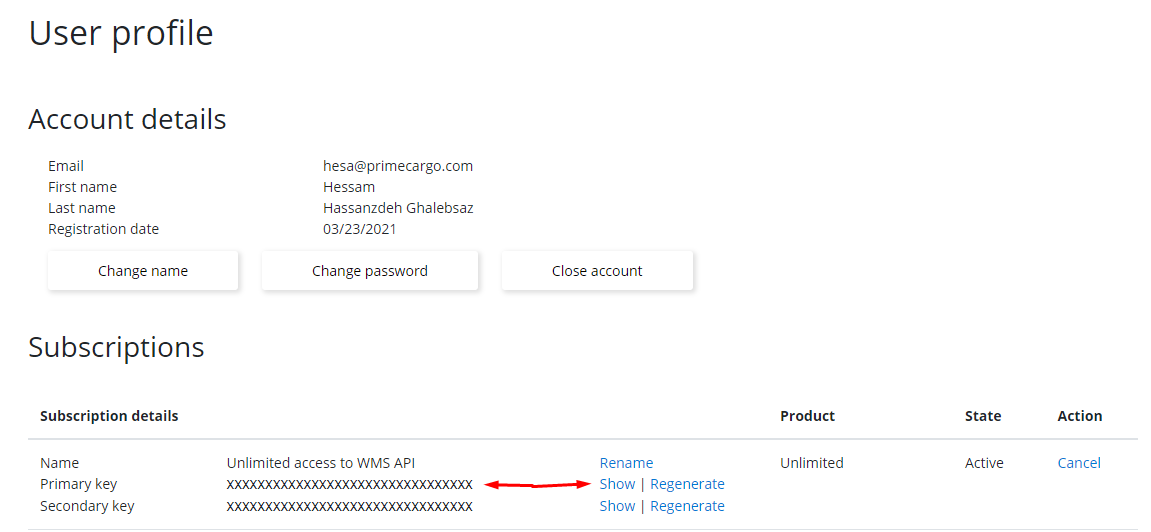
Now that you have your subscription keys you are ready to authorize your access to the API. This is the first step before using the actions of the API. In every API request you must add this subscription key.
F.x.Ocp-Apim-Subscription-Key: c124c1cegc075f5096488b7b9g20fc0e.
But before trying out any of the actions, you must start by requesting the Auth (AquireToken) action. This action will return a response including the GetAuthTokenResponseDTO JSON object which has one property, namely token, if the action succeeds. This token is also a header value that must be included in the header in every request. The token is valid for 24 hours, thus it must be renewed every 24 hours.
F.x.Authorization: bearer eyhdfDFdfgjsdfgLDFGKFGgjms4565FLKGBBfdxbFDSKGMJDFKBJFD46KLMBfKBMd324546frGKJXFBKXDFKGMSDkgxfbjkRFOGSPektIPWÅCVWKidkfifgirlpDSPFsfmsdepepgdreoiwqDOSDPEfmndflsoeoisdf-sofesdGDFOgi.psEOSDFGORIT.Er34345DPVSDeæcfxdfvberoERTfcDERFgXDFREgsdfgERDxdfgdfagDERTGsdfgargtFdgRzfgzREfgdbRGZDFgzfFgZ45345DASFGdFGxcfSDgXcfXcfGDFRgdcvbf_ig
Below you can see an example of a request to the Auth (AquireToken) action and to the GetProduct action, and their corresponding responses. The requests are sent from the API Managers developer portal, manually, where you are able to try out actions, and learn more about the received responses. Here the subscription key is also added for us automatically.
Request Auth (AquireToken) action
Auth (AquireToken) response
As mentioned, when you have received your token you must add it as a value to the authorization header in every request. Below is an example of a request, from the developer portal, where the authorization header is added with the token as value prefixed with bearer.
How to use the API functions in the right sequence
After receiving a token the client can start interacting with the API through the available actions. Since Prime Cargo is hired to act as a client's warehouse the main concerns are informing Prime Cargo of the goods to be received, what inventory is available and sending goods to the end consumer.
Creating and updating products
To be able to receive and store goods, Prime Cargo needs information about what goods can be received. To do this the client needs to request the CreateProduct action. This action requires that the JSON Product object is passed in the request body. This product must at least include the partNumber property, barcode property and typeId property, these are mandatory in order to create a product. Although, Prime Cargo highly recommends also including the description property and at least a couple of variant properties.
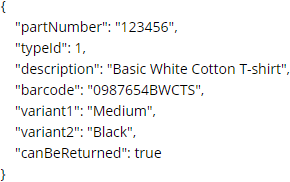
The above is an example of a JSON Product object passed in the body of the request to the CreateProduct action. This product is one the client wants to create at Prime Cargo, because at some point Prime Cargo will receive goods of this kind. The product includes the client's partNumber, description and barcode, and also variant1 is used to determine the size while variant2 determines the color. The typeId is set to 1, meaning "Flat". This property is limited by Prime Cargo to 1 (Flat), 2 (Hanging), 3 (Box), 4 (Oversize) or 7 (Assortment/Sortiment), and agreed upon with the Integration Manager. As you can see the product in the example can also be returned by the end consumer. These are some, amongst many, of the properties available for products. Please check the details of CreateProduct to learn more about the other available properties. When the product is created the API will return it in the data property of the JSON response object. The created product will have received a Prime Cargo specific productId which should be saved at the client's end, because it is required when creating goods receivals and pick orders, and otherwise referencing products.
Information about the product is subject to change, if the input data is not what was agreed upon with Prime Cargo. This would typically be what could be thought as metadata about the product. F.x. Prime Cargo might change typeId of the product once the goods are received, if the product is specified as 1 (Flat), but in fact should be 3 (Box), or Prime Cargo might change the weight of the product. If this should happen the client has the possibility to receive notifications via a webhook (this webhook is not yet implemented), or via the agreed upon method of notification.
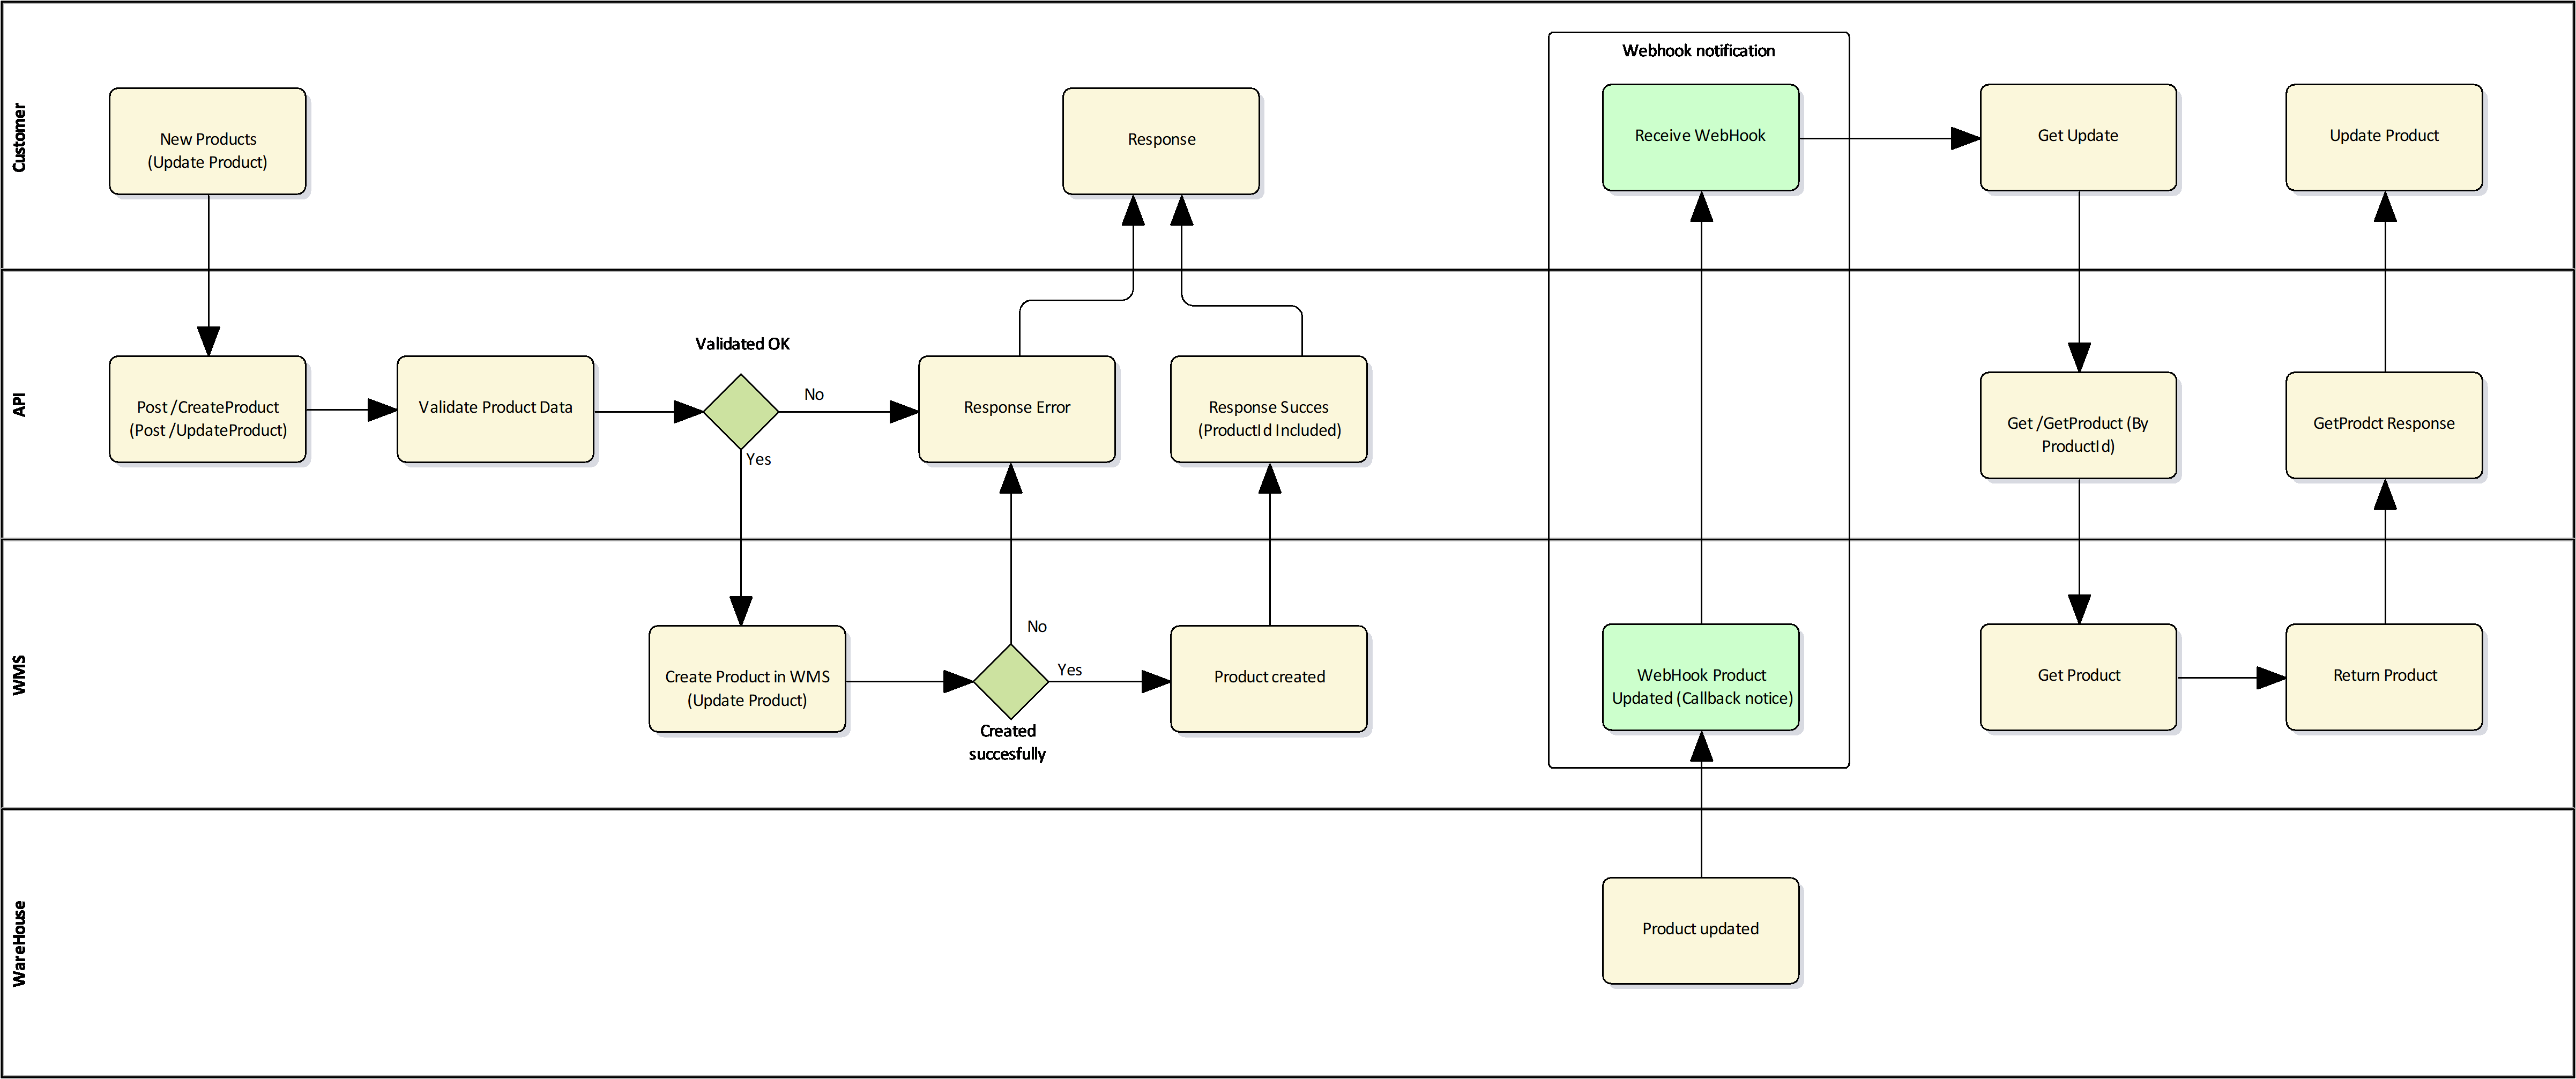
Below is a diagram showing the flow of product creation and product updates. Besides that, the action at the client's end, and Prime Cargos end, and the interaction between the stakeholders is also illustrated.
Creating and updating goods receivals
With this essential data in place, Prime Cargo can start receiving goods and sending them to the end consumer when appropriate. The flow of requests, actions and data can be seen in the diagrams below. These flow diagrams are based on the ideal scenario, and do not take any other scenarios or options into account. Instead alternative options will be discussed.

Here it is clear that the client creates a goods receival once the client's supplier confirms delivery with an ETA. The client will start by checking if each product exists, either by confirming that the Prime Cargo specific productId has been saved for each product, or by requesting the GetProduct action with the barcode of the product, and if a product is returned, saving the Prime Cargo specific productId at the client end for future usage. If a product does not exist at Prime Cargos end, the CreateProduct action must first be requested, for this product, and when the product is created and returned, the Prime Cargo specific productId should be saved at the client's end for future usage. Once the client has confirmed that every product in the goods receival exists at Prime Cargos end, the client can request the CreateGoodsReceival action. The diagram illustrates a request for the CreateGoodsReceival, with a complete GoodsReceival JSON object.
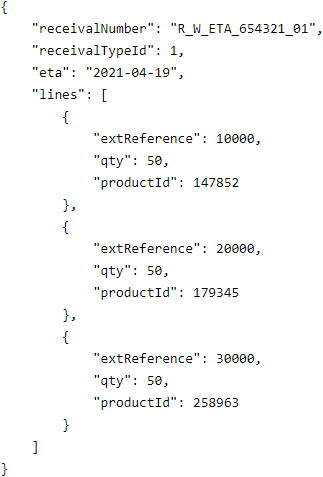
As you can see above, this GoodsReceival JSON object contains both the mandatory properties, receivalNumber, receivalTypeId and eta, and lines, a collection of GoodsReceivalLine objects, which make it a complete GoodsReceival. If this action succeeds the response body will contain a JSON response object, in which the data property will contain the created GoodsReceival, which will include a Prime Cargo specific goodsReceivalId, and for each GoodsReceivalLine, a Prime Cargo specific goodsReceivalLineId.
An alternative route would be to request the CreateGoodsReceival action with a GoodsReceival JSON object, not including lines, storing the Prime Cargo specific goodsReceivalId, returned in the response, temporarily, to use it in the request for the AddGoodsReceivalLines action afterwards, with a collection of GoodsReceival JSON objects, which will add the lines to the GoodsReceival. Note that the mandatory properties to create or add GoodsReceivalLines are the ones shown in the examples (extReference, qty, productId or productBarcodeId if alternative barcodes are allowed).
The incomplete GoodsReceival object in the body of the request to the CreateGoodsReceival action.

The collection of GoodsReceivalLine objects in the body of the request to the AddGoodsReceivalLines action.
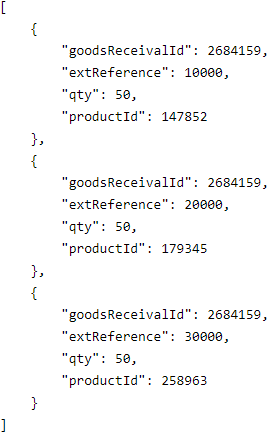
As soon as Prime Cargo receives the GoodsReceival, complete with at least one GoodsReceivalLine, Prime Cargo can start receiving goods from the GoodsReceivalLines in this GoodsReceival.
It goes without saying that if these actions to not succeed because of errors, these errors must be handled by the client. But CreateGoodsReceival as well as AddGoodsReceivalLines might succeed with warnings, and the client must consider these warnings, and determine which should be handled and which could be ignored. Typically warnings from these actions are concerning lines not created or added, and these should be handled accordingly by the client to make sure that any and all corrections will be performed, so that the client can attempt to add the lines that were not created or added, once again. See the list of errors and warnings for details about possible errors and warnings from the mentioned actions.
When the goods are shipped and arrive at Prime Cargo, they will be received in the WMS on the appropriate GoodsReceival. For every receival a GoodsReceivalLineReceived will be created and stored at Prime Cargo. It is possible to subscribe a webhook to this event (not yet implemented), and use the webhook notification to update the stock information at the client's end, close to real time.
Alternatively the client has the option to pull updates in intervals, f.x. every hour, by requesting the GetGoodsReceivalsByReceivalLineUpdate which will return a collection of entire GoodsReceival objects, which have been updated with receivals since the given date and time. But the GoodsReceival will include all lines and all receivals for each line, even receivals that were handled before, hence our mentioning of entire GoodsReceival objects. If this is the preferred method of receiving updates, the client should save the time the action is requested, and the next time the action is requested this time minus one second should be passed as the parameter. In this way the client can be sure that it receives GoodsReceival objects that have been updated after the time of last request, even if a receival happened at the same time as the last request.
But because the entire GoodsReceival object is returned, including all GoodsReceivalLine objects and all GoodsReceivalLineReceived objects, also previously handled GoodsReceivalLineReceived objects, it is required that the client implements logic to only handle the unhandled receivals, and update the clients end with information from only those. One way to do this is to save the highest GoodsReceivalLineReceivedId, for each GoodsReceivalLine, in the current process, and in the next process filter the GoodsReceivalLineReceived objects by GoodsReceivalLineReceivedId, so that in the next process the client only handles receivals with GoodsReceivalLineReceivedId higher than the GoodsReceivalLineReceivedId saved in the current process.
Below is an example of a response from a GetGoodsReceivalsByReceivalLineUpdate action, that succeeded. The action was requested at 14:00:00.000, and with the parameter, 2021-04-19 12:59:59.000, which is one second before the first time the action was requested. The first time the action was requested the response only included one GoodsReceivalLineReceived , and only on the first GoodsReceivalLine (see also the times of the GoodsReceivalLineReceived vs. the time of the passed parameter, 2021-04-19 12:59:59.000). Because the GoodsReceivalLineReceived was the only one on that GoodsReceivalLine at that time, the GoodsReceivalLineReceivedId was saved as the highest handled GoodsReceivalLineReceivedId for that GoodsReceivalLine. No other GoodsReceivalLine has any GoodsReceivalLineReceived so the highest GoodsReceivalLineReceivedId for those GoodsReceivalLine objects was saved as 0.
This time, notice that the client has received a collection with only one GoodsReceival object, which means that there has only been receivals on one GoodsReceival since the action was requested the first time. Next, notice that the client has received the entire GoodsReceival object, including all GoodsReceivalLine objects and all GoodsReceivalLineReceived objects for each line. Also notice that the first GoodsReceivalLine now has two GoodsReceivalLineReceived objects, where the GoodsReceivalLineReceivedId of the first GoodsReceivalLineReceived is 4897512, which was the highest handled GoodsReceivalLineReceivedId saved the first time the action was requested. Therefore the GoodsReceivalLineReceived object with GoodsReceivalLineReceivedId 4897512 should be ignored, this time and every other upcoming times. As there was no highest handled GoodsReceivalLineReceivedId for the other GoodsReceivalLine objects, any and all GoodsReceivalLineReceived for those GoodsReceivalLine objects should be handled this time.

Each GoodsReceivalLineReceived will tell what product was received, on which GoodsReceivalLine, how many and when it was received. On each GoodsReceivalLine the finished property will indicate if the GoodsReceivalLine is finished and closed, thus no more can be received on this GoodsReceivalLine and The amountReceived is the total amount received until the time in question. From finished and finishedTime in the GoodsReceival object, it can be determined if the entire GoodsReceival is finished and closed, and when this occurred, meaning if nothing more can be received on this GoodsReceival, and from when. The receivalTypeId 1 tells that this is a normal goods receival from a supplier. Had it been 2 we would know that it is a return from a end consumer, and returnPickOrderNumber would tell us the which pick order (or sales order) is returned. Also reasonCode on the GoodsReceivalLine will describe why the end consumer returned the product. These codes will are the agreed upon, with Prime Cargo.
For some clients goods won't be ready to pick and send before the entire GoodsReceival is finished and closed, and here it is also possible to subscribe a webhook to the GoodsReceivalClosed event. If this is preferred Integration Manager at Prime Cargos must contacted to create the subscription, and when this is done, the client will be able to add the endpoint through a request to the UpdateTriggerURL action. This action requires an id parameter, which is the id of the created subscription, also called OwnerTriggers, and a url parameter, which of course is the URL of the endpoint, where the notification should be delivered.
Creating and updating pick orders
The diagram below shows how to create a pick order. Notice that we make sure that the pick order status is set to ready for release right away. It also shows us how we can check if a pick order has been released and packed, and afterward update our sales order. Ideally, we would use webhooks to receive change notifications and update our sales order, but an alternative is to periodically get updated data, and update our sales order with the changes received.

More to come.